Materials
- 3 Styrofoam balls: 3", 2 1/2", 2"
- craft glue
- 1 sheet black felt
- orange craft paint
- 5-6 round toothpicks
- 2 small twigs
- 11" of 7/8" ribbon (any color)
- butter knife or dull tool for cutting foam balls
|
 |
|
- Cut bottom and top of 3" and 2 1/2" size balls flat. Cut one side of 2" ball flat also. Leave balls as round as possible, flatten only enough to stand upright. (fig. 1)
- Paint one toothpick half orange and set aside to dry.
|
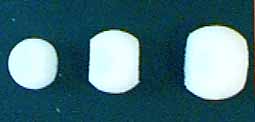
fig. 1 |
|
- Place two to three toothpicks into top of 3" ball so that 1/3 of the toothpick is visible. (fig. 2)
|
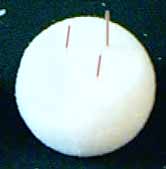
fig. 2 |
|
- Put glue onto bottom of 2 1\2" ball and place on top of 3" ball making toothpicks poke through the 2 1/2" ball until balls touch. (fig. 3)
|
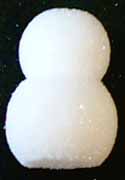
fig. 3 |
|
- Repeat this step with the 2 � " and 2" ball using only one or two toothpicks. (fig. 4)
- Set aside to dry.
|

fig. 4 |
|
- Cut three 1/2" circles from the black felt for buttons, also cut two 1/4" circles for the eyes, and a smile 1 1/4" wide for the mouth. (fig. 5)
|

fig. 5
|
|
- From the black felt, cut a circle 2 1/2" for the hat brim.
- Then cut a strip1 1/2"x 4" to make the hat's crown. (fig. 6)
|

fig. 6 |
|
- Glue the strip ends together overlapping1/2" to make the crown and then glue the crown to the brim.
- Cut a circle 1 1/2" for top of the hat out of the black felt and glue to crown top. (fig. 7)
- Set hat aside.
|

fig. 7 |
|
- Glue eyes, and mouth onto Snowman's face.
- Glue the buttons onto Snowman's chest so they are spread out evenly.
- Glue hat onto Snowman's head. Let dry before you continue. (fig. 8)
|

fig. 8 |
|
- Break toothpick 1/4" below paint line and put glue on this end.
- Poke toothpick through into ball between eyes and mouth so that only 1/2" shows.
- When glue is dry take the ribbon and tie it around the Snowman's neck, place small amount of glue at scarf knot to secure. (fig. 9)
|

fig. 9 |
|
- To finish your Snowman break the twigs into a length of 2-3" for his arms.
- Place glue on the end and stick them in to the Snowman's middle ball where they belong and push them in about 1/2" so they are secure. (fig. 10)
|

fig. 10 |
|
- Now your Snowman is ready to decorate any table or window.
|
 |
|